Creating the Rules for Making Credit Decisions
D&B Credit Premium lets you build customized, hierarchical rules for credit decisions. Administrators may build decision rules from the ground up, use the provided Global Decision Rule template, or copy an existing decision rule.
Multiple decision rules can be created, with each rule having a segment to differentiate it. A segment defines which applications will be evaluated by the decision rule; e.g., a decision rule may be designed specifically for applicants in a certain location, line of business, or other key characteristic.
Each decision rule can be made up of multiple outcomes. Outcomes are the detailed decisions that can be given to an applicant. Possible outcomes include the following:
- Approval, of which there are three types (Approved 1, 2, and 3)
- Pending, of which there are three types (Needs Review, Manager Escalation, and Supervisor Escalation)
- Declined
Each of these outcomes is defined by conditions. A condition is the logic needed to be met in order to satisfy an outcome; e.g., if the PAYDEX is greater than 60, then the outcome is Approved 1.
Commentary may also be assigned to each outcome. Commentary is free form text that includes explanatory or instructional information about the credit decision. It will be displayed when the outcome is satisfied.
Rules are defined and turned On (enabled) from the D&B Credit Premium Decision Rules page, accessible only to Administrators. All of the following are required for a decision rule to be turned On for use in the workflow:
- The decision rule must be named.
- The currency to be used with the decision rule must be defined.
NOTE: The reason for this is that there may be several currencies coming in from applicants, so one currency needs to be defined in order to evaluate the applicants. In one example, all of the applicants can be approved if they have Tangible Net Worth over $1,000,000 US Dollars. A UK applicant that has its financials in Pound Sterling (£) will need that amount converted to the US Dollars before being evaluated. This ensures the Tangible Net Worth is over $1,000,000 US Dollars.
- At least one outcome has been defined with at least one completed condition. No conditions can be incomplete or the decision rule will be considered incomplete.
- The default outcome must be defined. If none of the conditions within the outcomes are met to trigger an outcome, the default outcome will be presented.
Accessing the Decision Rules Page
Users can create a new rule or copy an existing rule within the Decision Rules page.
To view the Decision Rules page:
- Go to the Tools section.
- On the left side of the screen, select Guidance, Decisions, then Decision Rules. The Decision Rules page displays.
- Users can also Create a New Decision Rule from this page.

Using AND/OR Logic to Create Conditions
Creating decision rule segments and outcomes may require the use of AND/OR logic. With the AND logic, all of the conditions must be met in order to satisfy the segment or outcome. The OR logic looks at each condition independently, meaning that only one of the conditions needs to be met in order to satisfy the segment or outcome.
Defining the Rule Name
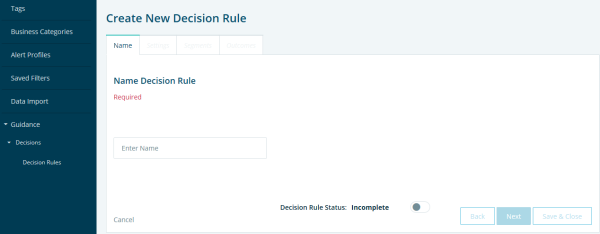
When creating a new rule, only the Name is required to save the rule. Since there can be multiple decision rules, a name is needed to differentiate between the various decision rules.
To define a new rule name:
- Navigate to the Decision Rules Page.
- Click Create New Decision Rule.
- Enter a Name for the Decision Rule.
- Click Next to open the Settings tab.
NOTE: The Decision Rule Status on the bottom of the screen displays as Incomplete and the ability to turn on the Decision Rule is disabled until all required fields have been defined for the credit rule.
Defining the Settings
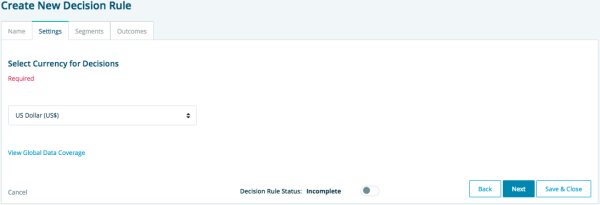
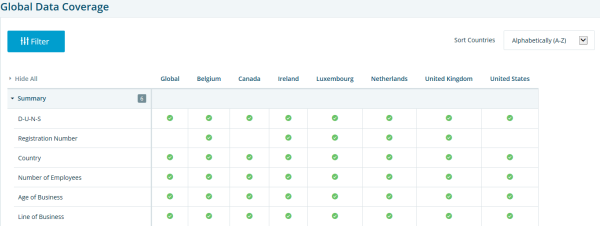
The currency is defined in the Settings tab. Here, you can also access a Global Data Coverage chart that lists data element coverage by location. This may help in defining the types of rules that may be needed for a location.
- In the Decision Rules Settings tab, select the Currency needed to evaluate the application.
- Optionally, review the Global Data Coverage chart by selecting and applying specific locations to see which data elements are in use across different locations.
- Click Next to open the Segments tab.
Global Data Coverage
A Global Data Coverage chart is included to assist you with creating and applying rules that apply to specific locations. Use the Filter to select one or more locations to see which data elements are in use across different locations. Link to the Global Data Coverage chart from the Decision Rule Settings tab.
Defining Rule Segments
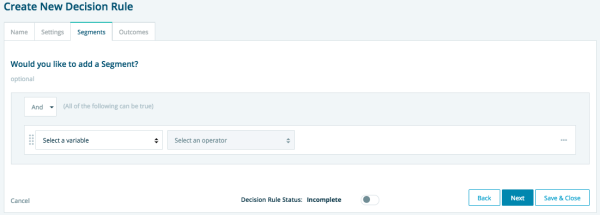
This option allows administrators to define which category of companies should be evaluated by this rule. Defining the segments for a rule is optional; however, if no segment is defined for the rules, any applicant can be evaluated by the decision rule. For example, you may want to define a segment specifically for applicants in a certain location, industry, or other key characteristic.
Creating segments may require the use of AND/OR logic. Refer to the Using AND/OR Logic to Create Rules section for more information.
- Select the And/Or logic.
- Select a variable.
- Select an operator.
- Optionally, add more conditions by clicking the ellipses (three dots) on the right side and select Add Condition. The new condition will be added directly below.
- Optionally, add a group of conditions (which is a collection of conditions defined by AND or OR logic nested within higher AND or OR logic). A group of conditions can be added by clicking the ellipses (three dots) on the right and selecting Add Group. The new group will be added directly below it.
NOTE: Use the ![]() (eight dots) icon on the left to drag and drop conditions.
(eight dots) icon on the left to drag and drop conditions.
Defining Outcomes
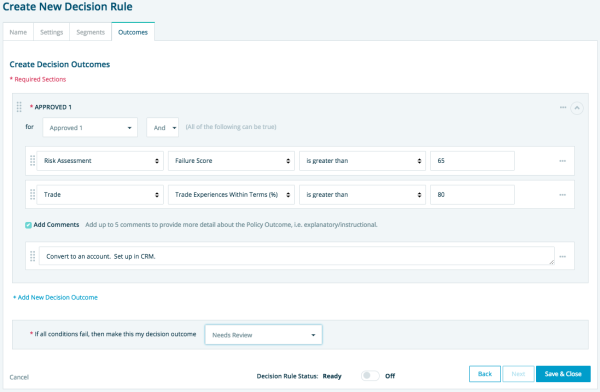
Each decision rule must have at least one outcome but multiple outcomes can be defined. Similar to the list of decision rules, outcomes are evaluated in the order they are listed. The automated decision work flow evaluates a company against each outcome until the conditions of an outcome are satisfied. This makes the hierarchy of outcomes very important. The hierarchy can be changed by using the ![]() (eight dots) icon on the left side to drag and drop the outcome on the list.
(eight dots) icon on the left side to drag and drop the outcome on the list.
Creating outcomes may require the use of AND/OR logic. Refer to the Using AND/OR Logic to Create Rules section for more information.
- In the Outcomes tab, select from the predefined list of outcomes.
- Select the And/Or logic.
- Select a topic.
- Select a variable.
- Select an operator.
- Optionally, add a condition to the outcome by clicking the ellipses (three dots) on the right of the condition. The new condition is added directly below.
- Optionally, click Add Comments to enter detail about the outcome. Comments are visible on the Credit Application results, and can be helpful to the user reviewing the results.
NOTE: If you click the ellipses (three dots) at the outcome level, a new outcome can be created or the current outcome can be copied. You can also click the plus (+) sign at the bottom of an outcome to add additional outcomes.
- Select a required default decision outcome (e.g., escalate, decline). If all conditions fail (none of the conditions are satisfied), then this will be the decision outcome.
- Click Save and Close.
Once the rules are defined, the next step is for the Administrator to Automate the Decision Rules.

