Account Details
This is a detailed view of D&B and your Account information that comes up when you select an account. This view will give you access to:
- Account Summary
- Credit Analysis
- D&B Info
- Customer Info
- SBRI Info*
- Financials
- Principal Info*
- Documents
- Notes & To-Do’s
NOTE: *These sections will appear only when a user has those privileges from the administrator.
Account Summary
This section provides a summarized view of the fields important to you and your organization. Please note that you can contact your eRAM administrator to configure this page.
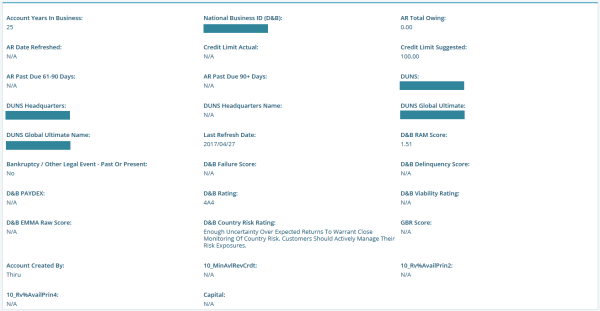
FIGURE 1. Account Sumnmary
eRAM Administrators can edit this view using the steps below:
- Select Tools.
- Select Configuration on the Left Navigation and Account Summary.
- Configure the groups. They will appear in alphabetical order on left hand navigation under Account Summary.
Credit Analysis
This section provides risk assessment information such as RAM Score (your personalized risk assessment score) as well as other scores. In addition, you can see Credit Limits and Credit Status.
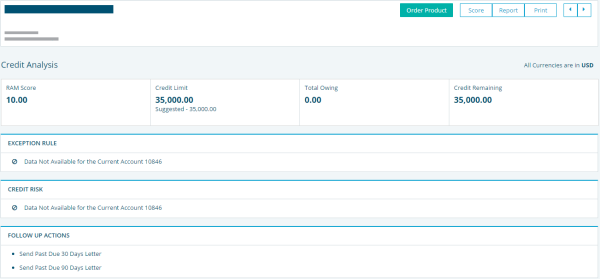
FIGURE 2. Credit Analysis
D&B Info
This section shows three independent sections:
- Account Info: Including Demographics, Ratings, Indicators, Country Risk, and Investigations.
- Corporate Exposure: Including Family Tree D-U-N-S, Amount Owed and Suggested Credit Limit, and Total Corporate Exposure.
- D&B Scores: Including PAYDEX, Delinquency, EMMA, Failure, and Viability.
Customer Info
This section shows four sections:
- Customer Account Info: includes information that you entered about the customer.
- Custom Fields: includes any custom information that you entered.
- Bank References: includes any customer received bank references that are entered manually or via online applications.
Trade References: includes any customer received trade references that are entered manually or via online applications.
Adding Bank and Trade References
To create a new reference:
- Select the +New button.
- Enter the information.
- Click Save.
To export References:
- Select Export.
- Define the save location. References will be exported and saved in a .CSV file.
To delete a reference:
- Highlight the reference.
- Click Delete.
- Click Confirm.
SBRI Info
This section shows Small Business Risk Insight information about the customer.
Financials
The Financials List provides a list of all statements available for the account. To view a list of available financial statements or Industry Norms and Key Business Ratios, highlight and double click. In this section, you have the ability to view four pages:
- Financial List: view a full list of financials that you entered, from D&B or from Third Party Sources.
- Comparison: allows you to select up to 3 financials for a side by side comparison.
- Variance: allows you to select 2 financials to see the variance.
- Cash Flow Analysis: allows you to do cash flow analysis on up to 3 financial statements
Modifying and Viewing Statements
NOTE: The following instructions are for the Financials List View page.
To create a new statement:
- Select the + New button.
- Enter information.
- Click Save.
To edit the columns on the screen:
- Select Edit Columns.
- Highlight the column name.
- Select Add or Remove.
- Click Save.
To Export financial statement data on the screen:
- Select Export.
- Define the save location. Data will be exported and saved in a .CSV file.
To delete a statement:
- Highlight the statement.
- Select Delete
- Click Confirm.
NOTE: For the best results, select the current or most recent statement in the first position with the second and third statements in descending order of age. Cash Flow Statement 1 compares financial Statements 1 and 2; Cash Flow Statement 2 compares Financial Statement 2 and 3. All Cash Flow elements except Net Income and Interest which must be entered for the second & third statement.
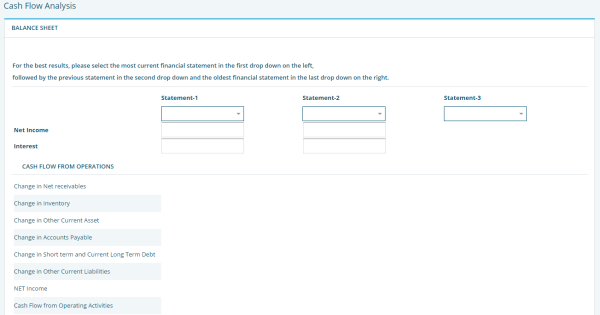
FIGURE 3. Cash Flow Analysis
Documents
This section is a repository of all documents associated to that account.

FIGURE 4. Documents
The actions you can take on this page include:
Adding new documents. To attach a new document:
- Select the + New button.
- Browse the files and select the document.
- Click open.
- Enter the name of the file to be attached.
- Click Attach.
Detaching (or removing) documents. To detach a document from the account:
- Highlight the document.
- Select the Detach button.
- Click Confirm.
Deleting documents. To delete a document from the eRAM database:
- Highlight the document.
- Select the trash can icon.
- Confirm the action.
NOTE: It is the customer's responsibility to ensure that personally identifiable information is not in documents that are stored in eRAM.
Notes and To-Do’s
This section is a repository of system/user notes and to-do’s associated to that account. The actions you can take on this page include:
| Button | Description |
 | Modify the view to see only “To Do’s,” “User Notes” and “System Notes” by toggling options |
 | Create new notes by clicking the + New button |
 | Select an existing note and delete it using the trash can icon |
 | Search for notes by type, date, user and more using the search icon |
 | Print notes using the printer icon |
 | Download notes using the download icon |
- © Dun & Bradstreet, Inc. 2019 – 2026. All rights reserved.