Configuration
Account Summary
Account Summary provides you with the ability to select the information needed for making decisions. You can configure the data elements you wish to see on the “Account Summary” page and this will affect all users.
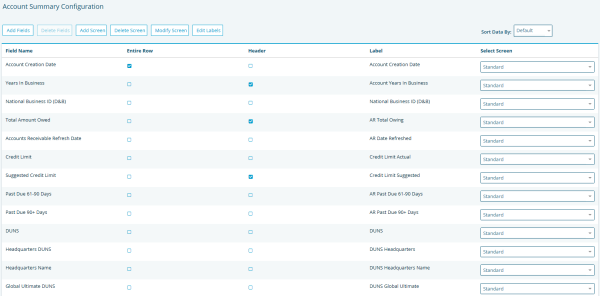
FIGURE 1. Account Summary Configuration
Adding Fields
To add a field:
- Click the “Add Fields” button.
- Choose from the “Available Fields” that you wish to add.
- Click the “Add” button to move them to the “Selected Fields.”
- Click “Save” once complete.
- Select “Entire Row” for the field to remain as an independent row on the Account Summary or “Header” if you wish for it to be one of the elements displayed in the top row.
Deleting Fields
To delete a field:
- Select the field you wish to remove.
- Click the “Delete Fields” button.
- Confirm the transaction.
Adding Screens
Adding a screen defines a new page for grouping data elements.
To add a screen:
- Click the “Add Screen” button.
- Enter a value in the “Enter New Screen Name” field.
- Click “OK” once complete.
NOTE: Each screen will appear under the Account Summary on the Left Navigation in alphabetical order.
Deleting Screens
To delete a screen:
- Click the “Delete Screen” button.
- Select a value in the “Select Screen Name” drop down.
- Click “OK” once complete.
NOTE: The Standard Group cannot be deleted or modified.
Modifying Screens
To modify a screen:
- Click the “Modify Screen” button.
- Select the screen you wish to modify in the “Select Screen Name” drop down.
- Enter a value in the “Enter New Screen Name” field.
- Click “OK” to complete.
NOTE: The Standard Group cannot be deleted or modified.
Editing Labels
To edit labels for the fields:
- Click the “Edit Labels” button.
- Modify the “Label” field for any field you wish to re-label.
- Click the “Save” button at the bottom of the page to complete.
Sorting Data Elements
To sort the data elements:
- Select “Ascending,” “Descending” or “Default” in the “Sort Data By” drop down.
NOTE: When configuring the Account Summary page, it if helpful to first decide what data you would like to view and if/how the data should be grouped and labeled. All changes must be saved.
Currency Conversion
The Currency Conversion screen is used by the Administrator to enter or update the currency conversion rates.
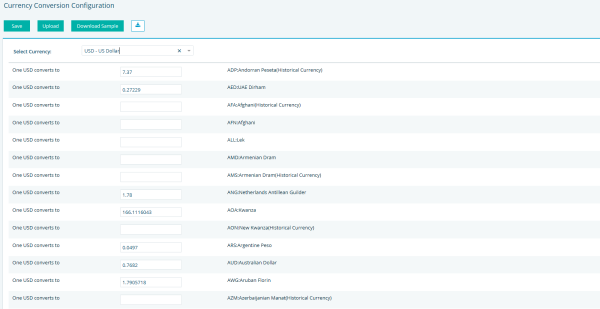
FIGURE 2. Currency Conversion Configuration
NOTE: Each Account has a currency code that is used for all information on the account (i.e. financial statements). You can specify the currency for an account or the default is set based on the address country for the D-U-N-S Number.
There are two options for configuring the way currency can be viewed:
- Single Currency - converts incoming data into the Base Currency.
- Multi-Currency - converts financial data into the currency defined on the User Profile.
NOTE: At least one Currency Conversion Rate must be defined, even if data of a different currency is not imported. If a Currency Conversion Rate is not defined, an error will occur during the import of data records that contain monetary fields.
To set up currency:
- Click Tools.
- Click Configuration.
- Click Currency Conversion.
- Select a Base Currency from the drop-down.
- Enter the appropriate conversion rate for each country in the account portfolio.
- Click Save.
All rates are inserted and stored at the same time regardless of any previous rate entries. When the user selects Save, eRAM will calculate the full matrix based on the current rates entered.
Single Currency
A Single Currency database converts financials to a Base Currency configured at installation.
Additional information:
- Changes to the Base Currency require a new database installation.
- If a Base Currency is configured, it will be the account currency for all accounts.
- All data is converted into the Base Currency with online orders and data import.
- Exchange rates must be maintained for each country/currency.
- The Account Country is compared to the D&B Country for all D-U-N-S Numbers during account setup. If there is a mismatch, non-financial statement currency fields (account currency fields) will be converted to the account currency if information exists in the Currency Conversion screen. If not, information on the Account cannot be saved.
NOTE: This validation will not take place for imported accounts.
Multi Currency
A Multi-Currency database maintains a local country currency.
Additional Information:
- The currency for an account is entered when an account is set up or defaulted to the Country Code that corresponds to the D-U-N-S Number.
- If a financial statement’s currency differs from the Account Currency, it will be converted to the Account Currency. The statement type will reflect an error statement.
- All financials, credit limits, reports, and accounts receivables will be displayed based on the local country currency.
- When information needs to be aggregated (i.e. portfolio analysis, viewing Corporate Exposure, Sum By, CBA, DSO, or the Dashboard), financials will be converted to the currency specified on the User’s profile.
NOTE: If tagging is required for error financial statements, then the Latest Date, Statement Type option should be selected on the Financial Selection Policy page.
Global Configuration
Global Configuration is typically modified at initial set up and it provides the Risk Management Consultant or eRAM Administrator the ability to define global settings for the application.
The following sections exist within this page:
- Demographics – fields used to populate reports. Any changes made will affect all users.
- Directory – this non-editable section tracks the eRAM link and default import/export.
- Credit Limit – fields used to control Decisions and Credit Limit changes.
- System Settings – information usually configured by a D&B Consultant, Hosting team, or the Implementation team that affects database configuration at installation.
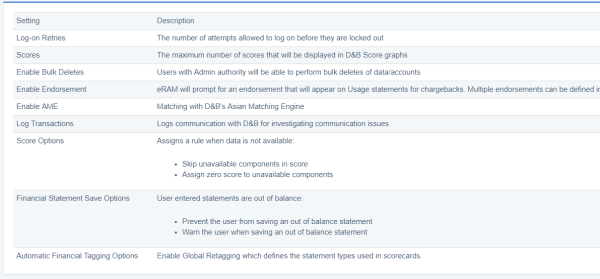
FIGURE 3. System Settings
- Communications – fields used to order information online from D&B, information must be specified. This information is typically entered by Risk Management Consultants, Hosting teams or the Implementation teams.
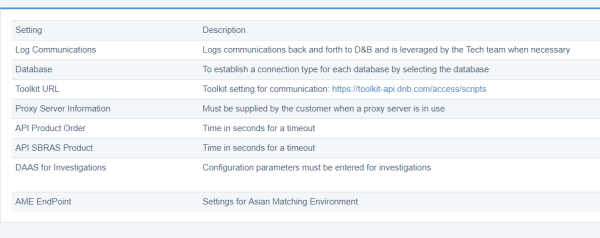
FIGURE 4. Communications
Notes and To Do's
The Notes & To Do’s configuration screen is used to add or delete note descriptions that appear on the description selection list when creating a new Note or To Do.
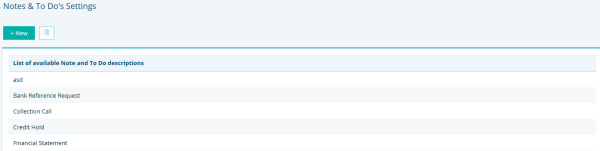
FIGURE 5. Notes and To Do's Settings
To create a new note description:
- Click +New.
- Enter the “New Note Type Description.”
- Click OK. The new description will appear on the list in alphabetical order.
To delete an existing description:
- Select an existing description.
- Click the Delete icon

- Confirm the transaction by clicking OK.
RAM Score Threshold
The RAM Score Threshold page allows you to adjust the cut off points used for Accepting / Rejecting / Warning decisions.
The chart shows the percentage of accounts that fall within each category. Hover over a section of the chart to display the number of accounts.
RAM Score categories include the following:
- Accepted - RAM Scores equal to or above the Acceptance Point
- Rejected - RAM Scores equal to or below the Rejection Point
- Warning - RAM Scores between the Acceptance and Rejection Points
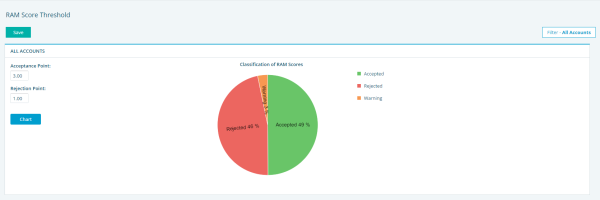
FIGURE 6. RAM Score ThResholD
To adjust the RAM Score Threshold:
- Update the “Acceptance Point” and / or “Rejection Point.”
- Click “Chart” to see how this would impact the decisions in your portfolio
NOTE: The chart can be viewed for the entire portfolio or a selected filter.
- Repeat Steps 1 and 2 until you are satisfied.
- Click Save.
Reports
The Reports screen provides a list of reports that can be viewed, printed, or downloaded from the application. This page gives you the ability to create, modify, import or delete a report.
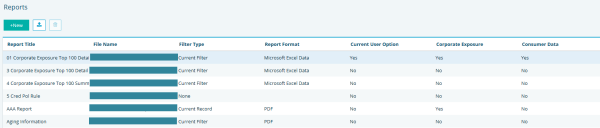
FIGURE 7. Reports
To modify a report:
- Double click an existing report. The Report Detail screen displays.
- Modify the desired fields including Report Name, Filter Use, and Report Format.
- Click Save.

To import a new report:
- Click the Upload icon.
- Click Choose File to select a report and click Upload.
- Double click the newly created report. The Report Detail screen displays.
- Enter a Report Name, Filter User, and Report Format.
- Click Save. The Report will display alphabetically within the Reports list.
NOTE: New Crystal reports must be in the necessary format with an .rpt extension.
To delete a report:
- Select a report from the list.
- Click the Delete icon
- Confirm the transaction by clicking OK.
System Notes
This page allows you to configure the application activities that should be tracked. Selecting any checkbox will result in a System Note being generated for that event and saved. These notes can then be viewed on the Notes & To Do’s screen.
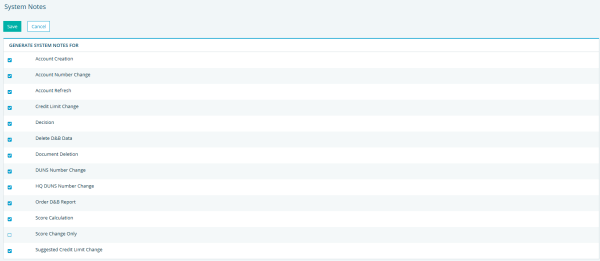
FIGURE 8. System Notes
NOTE: Limit the use of System Notes to the types that you will value and use. If allowed to accumulate over time, these notes could have a detrimental effect on the database performance.
System Notes can be generated for the following event options once checked:
- Account Creation
- Account Number Change
- Account Refresh
- Credit Limit Change
- Decision
- Delete D&B Data
- Document Deletion
- D-U-N-S Number Change
- HQ D-U-N-S Number Change
- Order D&B Report
- Score Calculation
- Score Change Only
- Suggested Credit Limit Change
- © Dun & Bradstreet, Inc. 2019 – 2026. All rights reserved.