Managing User Accounts
As an administrator, you can use the User Security window, Users tab to manage the following user information:
- Creating and deleting user accounts.
- Editing user accounts, including changing user passwords, assigning user security roles, and enabling or disabling users.
- Enabling or disabling access to the Data Information Toolkit (DITK).
Creating a New User Account
NOTE: This feature is only available to administrators.
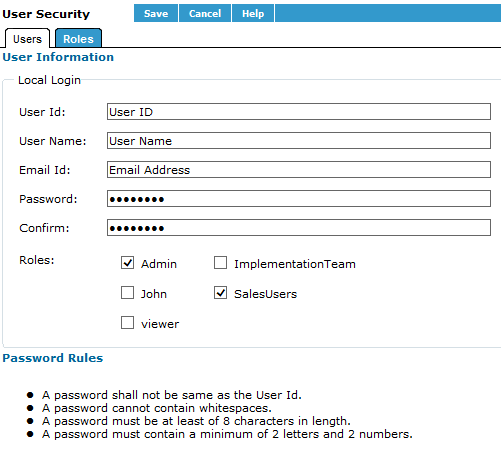
You must assign at least one role to a new user account. Only those roles available for you to assign will display as options.
- On the Home page (or Navigation) window, click User Security.
- On the Users tab, User Accounts area, click New.
- In the User ID field, type the user ID.
The user ID can be up to 50 alphanumeric characters with no spaces and can include special characters, such as periods, underscores and dashes.
- In the User Name field, type the user name.
- In the Email-Id field, type the user's email ID.
- In the Password field, type the user's password.
This is the password associated with the user name. The password must be at least eight characters, up to 50 alphanumeric characters, and contain a minimum of two letters and two numbers. For security reasons, the password displays as asterisks (*).
- In the Confirm field, re-type the password.
- In the Roles area, click the check boxes to select the roles you want to assign to the user.
NOTE: Click the check boxes to deselect any of the roles.
- Click Save.
Assign Roles to a User Account
NOTE: This feature is only available to administrators.
- On the Home page (or Navigation) window, click User Security.
- On the Users tab, User Accounts area, select a user.
- In the User Information area, click the check boxes to select the roles you want to assign to the user.
NOTE: Click the check boxes to deselect and unassign roles.
- Click Save.
Deleting a User Account
NOTE: This feature is only available to administrators.
When you delete a user, you remove the user account from the system. If you want to disable an account temporarily, see Disabling and Enabling a Use Account.
- On the Home page window, click User Security.
- On the Users tab, click the check boxes beside the users you want to delete.
- Click Delete.
A confirmation message displays asking you to confirm your selection(s).
- Click OK to confirm and delete the selected users.
Disabling and Enabling a User Account
NOTE: This feature is only available to administrators.
In order to log on, a user account must be enabled. You can disable a user's account without deleting the account in order to prevent users from logging on to D&B Integration Manager.
- On the Home page window, click User Security.
- On the Users tab, User Accounts area, locate the user whose account you want to disable.
- In the Status column for that user, click enabled to disable the user.
The Status column works as a toggle. Click Enabled to change the status to Disabled, and click Disabled to change the status to Enabled.
Editing a User Account
NOTE: This feature is only available to administrators.
- On the Users tab, User Accounts area, click a User ID that you want to edit.
- On the User Information window for that user, you can change this information:
| User Information | To Edit... |
|---|---|
| Email ID | Place your cursor in the Email ID field and type a new email address. |
| Password | Place your cursor in the Password field and type the new password. In the Confirm field, retype the password. |
| Roles | Click the check box next to the roles you want to set for this user, or click to deselect any selected roles. The changes take affect the next time the user logs on. |
- Click Save.


