Step 10: Defining Export Parameters for Batch Workflows
After you define the export configuration parameters for the matched, unmatched, and all records results of a batch, D&B Integration Manager exports the results to a specified destination. The results are then available for other manual and automated processes. Export data is a flat file or, if using SQL Server or Oracle server, a database table. You can export data either to a file or to a database within D&B Integration Manager. When you run the batch process, D&B Integration Manager exports the matched, unmatched. and all records results using the parameters that you defined in the Workflow.
Export parameters such as directory and file name are user-defined. You select the appropriate option to save the export configuration. Export configurations are stored in the Common Customer Directory, and various options are available to name the file. The file name and file format are configurable.
- To export a text file, see Exporting a Text File.
- To export to a file system,Exporting the File to a File System.
- To export to an FTP server, see Exporting the File to an FTP Server.
- To export to a database table, see Exporting to a Database Table.
- To export an NLMI file, Exporting an NLMI File.
Exporting a Text File
To automatically export a text file as part of the batch process, define the export parameters in the batch workflow.
NOTE: This export is not applicable for NLMI.
You export a file to a specified directory or file name, or to an FTP server. When you install D&B Integration Manager, you can enable or disable the security feature. If you enable the security feature in D&B Integration Manager, it generates the required client certificate for the FTP client, which interacts with the destination FTP server.
The following scenarios are possible while configuring export parameters:
- If you are defining the export parameters for a secure FTP server, you need to provide D&B Integration Manager a relevant client certificate for the handshake: Do this by enabling the security feature during installation.
- If you are defining the export parameters for a non-secure FTP server, and the security feature is enabled, this message displays: Application could not establish a secure FTP connection with the FTP server. Click OK to proceed further with a non-secure FTP connection or click Cancel to change the FTP server details.
— or —
- If you are defining the export parameters for a non-secure FTP server, and the security feature is disabled,the file export parameters will be saved.
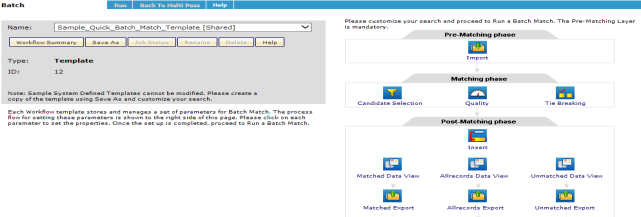
To define export parameters in a Batch Workflow:
- On the Home page window or the Navigation window, click Batch.
- On the Batch window, in the Name field, select a Batch Workflow template.
- In the Post-Matching phase area, click Matched Export, Allrecords Export, or Unmatched Export.
Exporting the File to a File System
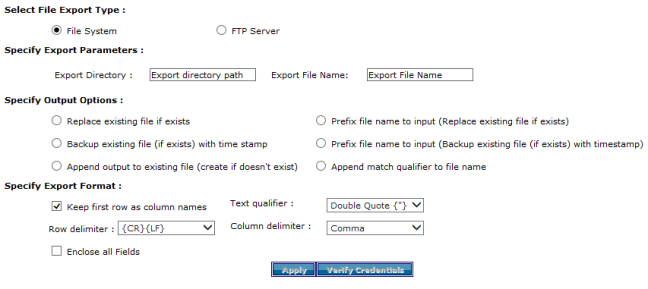
- In the Export > File Export area, click File System.
- In the Specify Export Parameters area:
- In the Export Directory field, type the Export directory path.
- In the Export File Name field, type the Export File Name.
- In the Specify Output Options area, complete these fields:
| Option | Description |
|---|---|
| Replace existing file (if exists) | Overwrites the existing file (if exists) else creates the new file. |
| Prefix file name to input (Replace existing file if exists) | File is saved as the input name followed by the name of the file. If the file already exists it is overwritten. |
| Backup existing file (if exists) with time stamp | Saves the existing file with time stamp and creates the new with same name (example: filename_YYYYMMDDHHMM). |
| Prefix file name to input (Backup existing file (if exists) with timestamp) | |
| Append output to existing file (create if doesn't exist) | It adds the contents to the already existing file and if it does not exists it creates a new one. |
| Append match qualifier to file name | It adds the jobid and type of export you have chosen to the file name.(example:filename_jobidmatch.txt). |
- In the Specify Export Format area, configure these settings (see the illustration that follows):
- In the Keep first row has column names label, select the check box to indicate that the first row contains the column names.
- In the Text qualifier field, select a qualifier: Double Quote {"}; Single Quote {'}, or None.
If the delimiter is a comma and the field value contains commas, you should select a text qualifier.
- In the Row delimiter field, select the delimiter that separates rows in the text file:
- {CR}{LF} to use a carriage and a line feed
- {CR} to use a carriage return
- {LF} to use a line feed
- Semicolon
- Comma
- Tab
- Vertical Bar
- In the Column delimiter field, select the delimiter that separates columns in the text file: Comma, Semicolon, Tab, Vertical Bar.
- In the Enclose all fields field, select the check box to enclose all fields in the selected text qualifier.
- Click Apply.
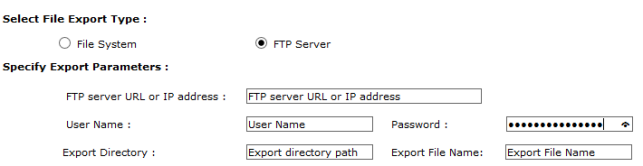
Exporting the File to an FTP Server
- In the Select File Export Type area, click FTP Server.
- In the Specify Export Parameters area:
- In the FTP server URL or IP address field, type the IP address for the server.
- In the User Name and Password fields, type the user name and password for the server.
- In Export Directory and Export File Name fields, type the directory and file name.
For Windows: Type the full path, for example, c:\app\destination, or a path relative to the File System or FTP server location such as app\destination.
For UNIX: Type the full path after the home directory, for example, app/destination or the full absolute path, for example, /home/cimuser/app/dest.
NOTE: If the destination directory is the home directory, you do not need to specify a path.
NOTE: The File System directory must be a valid directory in the D&B Integration Manager server. The FTP server directory location is defined outside of D&B Integration Manager . Contact your System Administrator if you are unsure of the File System directory or the FTP server location.
- In the Specify Output Options area, select these options as applicable:
| Option | Description |
|---|---|
| Replace existing file (if exists) | Overwrites the existing file (if exists) else creates the new file. |
| Prefix file name to input (Replace existing file if exists) | File is saved as the input name followed by the name of the file. If the file already exists it is overwritten. |
| Backup existing file (if exists) with time stamp | Saves the existing file with time stamp and creates the new with same name (example: filename_YYYYMMDDHHMM). |
| Prefix file name to input (Backup existing file (if exists) with timestamp) | |
| Append output to existing file (create if doesn't exist) | It adds the contents to the already existing file and if it does not exists it creates a new one. |
| Append match qualifier to file name | It adds the jobid and type of export you have chosen to the file name.(example:filename_jobidmatch.txt). |

- In the Specify Export Format area, configure these settings:
- In the Keep first row has column names label, select the check box to indicate that the first row contains the column names.
- In the Text qualifier field, select a qualifier: Double Quote {"}; Single Quote {'}, or None. If the delimiter is a comma and the field value contains commas, you should select a text qualifier.
In the Row delimiter field, select the delimiter that separates rows in the text file:
- {CR}{LF} to use a carriage and a line feed
- {CR} to use a carriage return
- {LF} to use a line feed
- Semicolon
- Comma
- Tab
- Vertical Bar
- In the Column delimiter field, select the delimiter that separates columns in the text file: Comma, Semicolon, Tab, Vertical Bar.
- In the Enclose all fields field, select the check box to enclose all fields in the selected text qualifier.
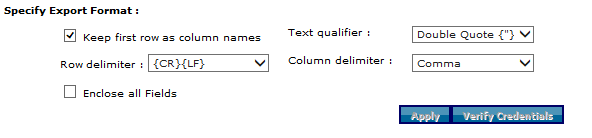
- Click Apply.
Exporting to a Database Table
You can define the export parameters in the Batch Workflow so that D&B Integration Managerautomatically exports the data to the database table as part of the Batch process.
To define export parameters in a Batch Workflow:
- On the Home page window or the Navigation window, click Batch.
- On the Batch window, select a Batch Workflow template.
- In the Post-Matching phase area, click Matched Export, Allrecords Export, or Unmatched Export.
- In the File Export window, click the Database Export tab.
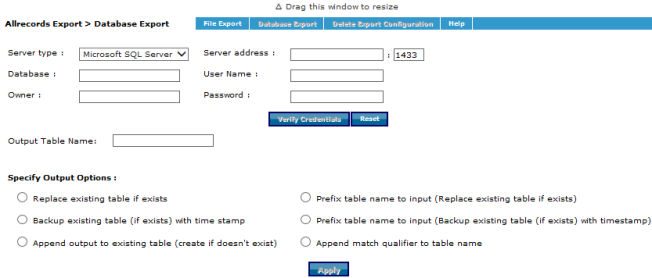
- In the Database Export window, specify the Database server details:
- In the Server type field, select either Microsoft SQL Server or Oracle server.
- In the Server address field, type the IP address of your server.
- In the Database field, type the name of your database.
- In the User Name field, type your user name.
- In the Owner field, type the name of the database owner.
- In the Password field, type your password.
- In the Output Table Name field, type the name of the table where you want to export the data.
- In the Specify Output Options area, select the options as follows:
| Option | Description |
|---|---|
| Replace existing table (if exists) | Overwrites the existing table (if exists) else creates the new table. |
| Backup existing table (if exists) with time stamp | Saves the existing table with time stamp and creates the new with same name (example: tablename_YYYYMMDDHHMM). |
| Prefix table name to input name (Replace existing table if exists) | Table is saved with the input name and table name concatenated. If the table already exists it is overwritten. |
| Prefix table name to input (Backup existing table (if exists) with timestamp) | Table is saved with the input name and table name concatenated.. If the table already exists it is saved with time stamp and new table is created with same name (example: tablename_YYYYMMDDHHMM). The table name might exceed the database name length limit, in which case, the table name will be truncated to meet the limit. |
| Append output to existing table (create if doesn't exist) | It adds the contents to the already existing table and if it does not exist it creates a new one. |
| Append match qualifier to table name | It adds the jobid and type of export you have chosen to the table name. (Example: tablename_jobidmatch.txt). |
- Click Apply.
Exporting an NLMI File
When you export an NLMI file, you can define the export parameters in the NLMI Batch Workflow to automatically export the job results and job reports as part of the NLMI Batch process. You can either export a file to a specified directory path or filename, or you can export to an FTP server. When you install D&B Integration Manager, you can enable or disable the security feature. If you enable the security feature, D&B Integration Manager will generate the required client certificate for FTP client. This client interacts with the destination FTP server.
The following scenarios are possible when you configure the export parameters:
- If you define the export parameters for the Secure FTP Server, the Administrator must specify a relevant client certificate for handshake when installing D&B Integration Manager.
- If you are defining the export parameters for Non-Secure FTP Server, and the security feature is enabled, this message displays: Application could not establish a secure FTP connection with the FTP server. Click OK to proceed further with non-secure FTP connection or click Cancel to change the FTP server details.
— or —
If you are defining the export parameters for Non-Secure FTP Server, and the security feature is disabled,the file export parameters will be saved.
Steps for Defining the Export Parameters in a NLMI Batch Workflow
- On the Home page window or the Navigation window, click Batch.
- In the Batch window, select an NLMI_Batch Workflow template, and click Export.
- You can select to export the file to a file system or to an FTP server.
- In the File Export window, to export the file to a specified directory, click File System or to export the file to an FTP server, select FTP Server.
- In the Select Appropriate NLMI Output Files For Export area, select Parent File, Parent & Child Files, or Child Files. For more information, see the description in the table that follows.
- In the Specify Export Parameters area:
- In the FTP Server URL or IP address area, type this information.
- In the User Name and Password fields, type this information.
- In the Export Directory and Export File Name fields, type this information.
- Select Export native match result to export only the NLMI match records in native language.
- Select Export native match result with append data to export NLMI match records along with English version of D&B Integration Manager Data.
- Select Export native match reports to export NLMI match reports.
For Windows: type the full path, for example, c:\\app\destination, or a path relative to the File System (or FTP Server location) such as app\destination.
For UNIX: type the path relative to the File System (or FTP Server location) such as app\destination or the full absolute path such as /home/cimuser/app/dest.
If the destination directory is the home directory, you do not need to specify a path.
NOTE: The File System directory must be a valid directory on the D&B Integration Manager server. The FTP Server directory location is defined outside of D&B Integration Manager. Contact your System Administrator if you are unsure of the File System directory or the FTP Server location.
If the number of records in a input file for a NLMI Batch workflow exceed the maximum allowed threshold, D&B Integration Manager will split the given input file and trigger multiple jobs. Jobs that D&B Integration Manager triggers with split input files are named Child Jobs. They result in child Files. The Job status window displays all child Jobs grouped under one Parent Job. The Parent job is a logical job that encapsulates information about child jobs. A Parent Job results in a parent file. See the following table for descriptions of these file types:
| File Type | Descriptions |
|---|---|
| Parent File | This file will have matching information for all the records that were imported to D&B Integration Manager as a single input file. |
| Child File | If the size of input file imported to D&B Integration Manager application is more than allowed limit, D&B Integration Manager splits the input file in to multiple chunks and treats each split file as a child file to the original imported file (parent file).Selecting this option results in the export of multiple files that have matching information for each of the split input file. |
| Parent and Child Files | Both the Parent and Child files are exported. The Parent file contains information for all of the child files. |
- Click Apply.
- © Dun & Bradstreet, Inc. 2019 – 2026. All rights reserved.