Manually Importing a File for Batch Matching
The Import wizard guides you through the import process. First you set up the import parameters, and then import the file.
NOTE: For automated batch processes, you need to save the import parameters in the Batch Workflow. For more information, see Defining Import Parameters for Batch Workflows.
Importing Your File and Setting the Parameters
When manually import a file, you can select either a Delimited file format or Fixed Width file format.
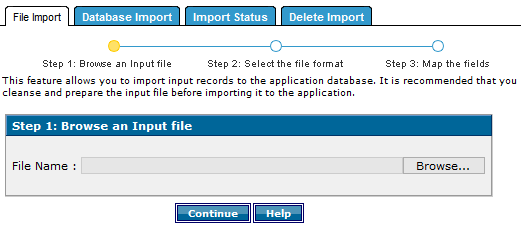
- On the Home page window or the Navigation window, click Import. The Import window File Import tab opens.
- In the Step 1: Browse an Input file area, File Name field, click Browse.

- Navigate to your local directory to locate the file you want to import.
- In the File Name field, after the file name displays, click Continue.
Additional steps provide instructions on how to import a delimited text file and a fixed-width text file.
Importing a Delimited Text File
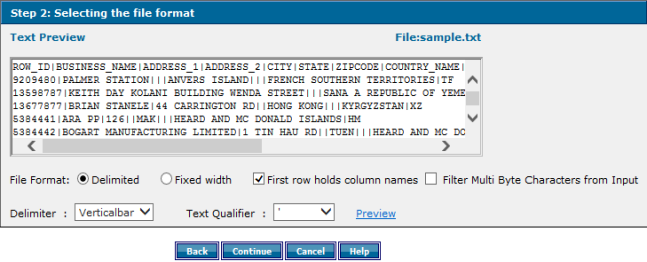
- In the Step 2: Selecting the file format area, File Format field, select Delimited.
- In the Delimiter field, select one of these choices: Comma, Tab, Semicolon, Verticalbar, or Other. If you select Other, a blank field displays where you can type a delimiter of your choice.
- In the Text Qualifier field, select {none}, ", or '.
NOTE: Be careful if you are using a comma as a delimiter because some company names contain commas. If you use commas as delimiters, you need to select an appropriate Text Qualifier to avoid misrepresentation of data.
- (Recommended): click to select First row holds column names field. In most cases, your file contains a header row at the top with column names. For more information, see Mapping the Fields
- Select Filter Multi Byte Characters from Input to enable multi-byte characters from the filtering process for the input or leave this field unselected to disable it.
- Click Preview to preview your file.
- Click Continue

Importing a Fixed-Width Text File
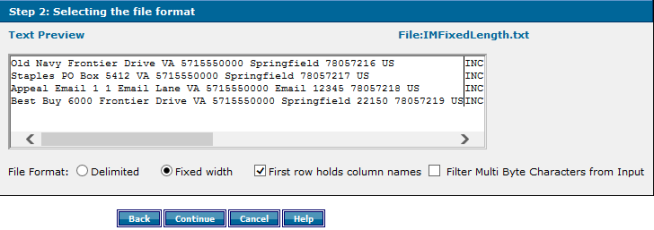
- In the File Format field, click Fixed width.
- In the Text Preview area, click the ruler to set each column delimiter. In the Columns field, the column widths that you set are represented by number ranges.
- (Recommended): select First row holds column names to specify that the column names are in the first row.
NOTE: In most cases, your file contains a header row at the top with column names. For more information, see Mapping the Fields.
- Select Filter Multi Byte Characters from Input to enable multi-byte characters from the filtering process for the input or leave this field unselected to disable it.
- Click Continue.

- In the Column selection window, click the ruler to set the columns. The new column settings display in the Columns field.
- Click Continue.

To continue, see Mapping the Fields

Mapping the Fields
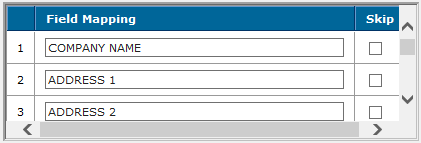
- In the Step 3: Mapping the Fields window, Field Mapping area, if you selected First row holds column names, each column name displays in the Field Mapping table.
- In the Step 3: Mapping the Fields area, Action field, select one of the following options:
- Append to Existing, and then select an existing table from the list.
- Create New Table, and in the Table field, type the name of the new table.

- To skip a column during the import process, In the Field Mapping area, select the Skip check box next to the column name(s) you want to skip.

- To import the file for a manual batch process, click Import. A message displays that the import process has been initiated, and a second message displays that the import completed.

