Configuring the System
Use the ![]() Configuration features to specify a group of parameters and preferences, which primarily affect scheduling in Batch Processing.
Configuration features to specify a group of parameters and preferences, which primarily affect scheduling in Batch Processing.
IMPORTANT: You need to set these parameters and preferences before you begin using Integration Manager.
Configuration includes the tasks and services described in these topics:
Defining Local Triggers
NOTE: This feature is only available to administrators.
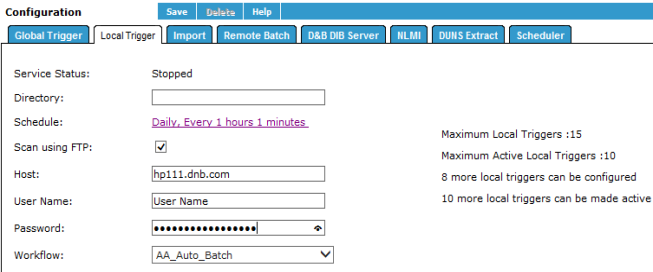
Set the parameters for a local trigger on the Local Trigger tab., including the directory location where the files are located and the frequency of the scan. When you define a trigger in an Automatic Batch Workflow, D&B Integration Manager uses these settings for scheduling and location purposes.
Some Important tips for defining triggers:
- To edit the trigger, you must set the Service Status field to Stopped.
- When you modify the trigger profile, the settings must be valid for the current environment. For example, if you specify a remote file directory for the location of the files to be scanned, you must have a live connection to that directory when you modify the settings.
- If you are defining the FTP server parameters, the parameters are saved based on whether the FTP server is secure or non-secure or is installed with the security feature enabled.
The parameters will be saved if:
- The Destination option you select is a secure or non-secure FTP server, and the security feature is disabled for the current D&B Integration Manager installation.
– or –
- The Destination option you select is a secure FTP server, and the security feature is enabled for the current D&B Integration Manager installation.
The parameters will not be saved if:
- The Destination option you select is a non-secure FTP server, and the security feature is enabled for the current D&B Integration Manager installation. In this scenario, this message displays — "Application could not establish a secure FTP connection with the FTP server. Click OK to proceed further with non-secure FTP connection or click Cancel to change the FTP server details."
Configuring Trigger Parameters
NOTE: This feature is only available to administrators.
NOTE: Any workflows that you configure as a Local Trigger are not associated to the Global Trigger. If you delete a Local Trigger, D&B Integration Manager assigns the workflow to the Global Trigger.
The Trigger directory is the directory where the files to be scanned are located. For Windows: Type the full path (for example: c:\app\config). For UNIX: Type the full path after the home directory (for example: app/config). If the scan directory is the same as the home directory, no path is required.
- On the Home page window, click Configuration.
- On the Configuration window, click the Local Trigger tab.
- In the Directory field, type the full path of the Trigger directory.
NOTE: You can enter a remote host name only if you are currently connected to that host machine.
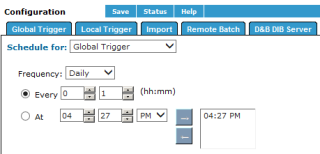
- In the Schedule field, click the current schedule link to edit the schedule for the trigger:
- In the Schedule for field, select the type of trigger.
- In the Frequency field, select Monthly, Weekly, or Daily
- In the Every field, select the hour and minutes.
– or –
- In the At field, select the exact time to schedule the trigger. Use the arrows to move times to and from the hour and minute and AM/PM fields.

- In the Scan using FTP field, select to scan the Trigger directory for any other FTP server except the application server.
- In the Host field, type the host name.
- Type the full IP address of the host machine (for example, hp111.dnb.com), In the User Name field, type the user name.
- In the Workflow field, select a Workflow.
If a workflow is configured with a database table as input pattern, its fields are disabled. If you edit access to a batch workflow, you can configure a Local Trigger for the workflow. Only Administrators and the Local Trigger owners have the access to modify that trigger, which displays as disabled to other users. If you delete a workflow, the Local Trigger that is associated with the workflow will be deleted.
- Click Save.

In the Scheduler Status area, Workflow list, the configured local triggers display with their schedule, status, and owner information.
- To edit a remote trigger, next to the workflow name, click Edit.
- Follow the previous steps, starting with On the Configuration window, click the Local Trigger tab.

Configuring Global Triggers
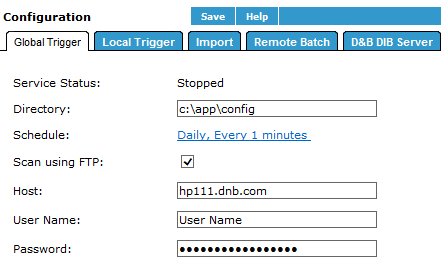
Use the Global Trigger tab to set the parameters for a global trigger, including the directory location where the files are located and the frequency of when D&B Integration Manager scans for triggers. When you define a Trigger in an Automatic Batch Workflow, D&B Integration Manager uses these settings for scheduling and location purposes.
Some Important tips for defining triggers:
- To edit the trigger, you must set the Service Status field to Stopped.
- When you modify the trigger profile, the settings must be valid for the current environment. For example, if you specify a remote file directory for the location of the files to be scanned, you must have a live connection to that directory when you modify the settings.
- If you are defining the FTP server parameters, the parameters are saved based on whether the FTP server is secure or non-secure or is installed with the security feature enabled.
The parameters will be saved if:
- The Destination option you select is a secure or non-secure FTP server, and the security feature is disabled for the current D&B Integration Manager installation.
– or –
- The Destination option you select is a secure FTP server, and the security feature is enabled for the current D&B Integration Manager installation.
The parameters will not be saved if:
- The Destination option you select is a non-secure FTP server, and the security feature is enabled for the current D&B Integration Manager installation. In this scenario, this message displays — "Application could not establish a secure FTP connection with the FTP server. Click OK to proceed further with non-secure FTP connection or click Cancel to change the FTP server details."
Configuring the Trigger Parameters
NOTE: Any workflows that you configure as a Local Trigger are not associated to the Global Trigger. If you delete a Local Trigger, D&B Integration Manager assigns the workflow to the Global Trigger.
- On the Home page window, click Configuration.
- Click the Global Trigger tab.
- In the Directory field, type the full path of the Trigger directory.
The Trigger directory is the directory where the files to be scanned are located.
- For Windows: Type the full path (for example:
c:\app\config). - For UNIX: Type the full path after the home directory (for example:
app/config). If the scan directory is the same as the home directory, no path is required.
NOTE: Enter a remote host name only if you are currently connected to that host machine.
- In the Schedule field, click the current schedule link to edit the schedule for the trigger:
- In the Schedule for field, select the type of trigger.
- In the Frequency field, select Monthly, Weekly, or Daily
- In the Every field, select the hour and minutes.
– or –
- In the At field, select the exact time to schedule the trigger. Use the arrows to move times to and from the hour and minute and AM/PM fields.

When a database table is used as input for auto batch, D&B Integration Manager can trigger the same batch job repeatedly by using the same input database table. This depends on the Trigger configuration. For example, set the time to one minute to trigger the batch job for every minute.
In addition, D&B Integration Manager is unable to determine whether the same input database table was used previously for a job run. This situation differs from auto batch processing that uses a flat-file as input. In that case, the system renames the input file as .bak to avoid using the same file in subsequent jobs.
- In the Scan using FTP field, select to scan the Trigger directory for any other FTP server except the application server.
- In the Host field, type the host name.
- Type the full IP address of the host machine (for example,
hp111.dnb.com). - In the User Name field, type the user name.
- In the Password field, type the password for the user who has access to the remote host.
- Click Save.


