Manually Exporting Batch Results
You can manually export data as a flat file or as a database table in the SQL Server or Oracle server. Or, you can export data either to a file or to a database within D&B Integration Manager.
- On the Home page window or the Navigation window, click Job Status.
- In the list of processed jobs, click matched, unmatched, rejected, or all records to display the batch results.
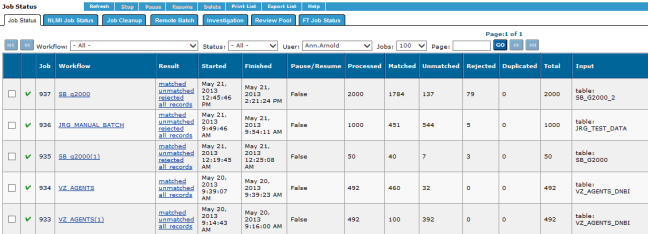
- Select the Export tab to export the results.

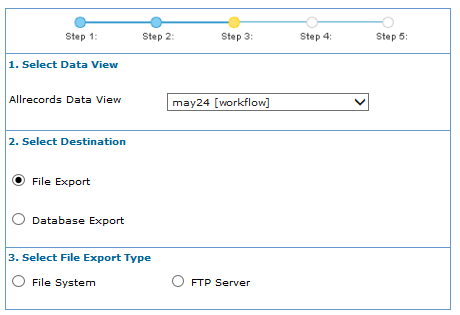
- In the Export wizard window, Select Data View step, select an appropriate data view to export the results.
- In the Select File Export Type area, select File System to export to a file system.
- In the Select Destination area, select File Export to export to a file.
- In the Specify Export Parameters area, complete the fields.
– or –
- In the Select File Export Type area, select FTP Server.
- In the Specify Export Parameters area, complete the fields.
– or –
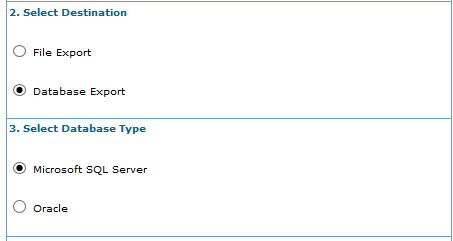
- In the Select Destination step, click Database Export.
- In the Select Database Type step, select either Microsoft SQL Server or Oracle.
- In the Specify Connection Parameters step, complete the fields.
- In the Specify Export Parameters step, complete the fields.
For more detailed information, Exporting the Batch Results to a File
Exporting the Batch Results to a File
You can export the batch results to a file by selecting a file system or an FTP server.
Exporting the Batch Results to a File System
- In the Select Destination step, click File Export.
In the Select File Export Type step, select File System.
NOTE: You cannot export duplicate records.
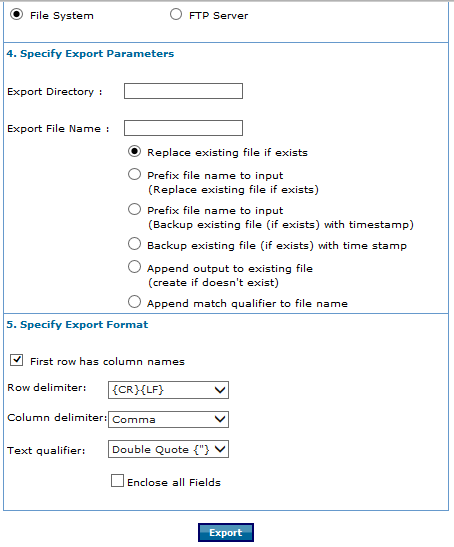
- In the Specify Export Parameters step:
- In the Export Directory field, type the directory path where the file will be saved.
- In the Export File Name field, type the name of the file.
For DB2, the length of the table name should be less than or equal to 18 characters.
- Then, select one of the following options:
- Click Replace existing file if exists.
- Prefix file name to input (Replace existing file if exists).
- Prefix file name to input (Backup existing file (if exists) with time stamp). (Example: tablename_YYYYMMDDHHMM).
- Backup existing file (if exists) with time stamp.
- Append output to existing file (create if doesn't exist).
- Append match qualifier to file name.
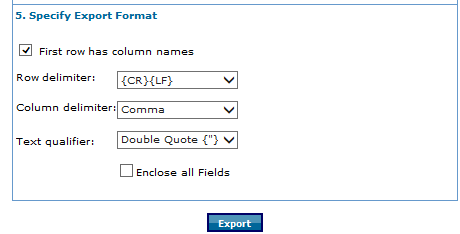
- In the Specify Export Format step:
- If the first row contains column names, select the First row has column names check box.
- In the Row delimiter field , select the delimiter that separates rows in the text file, for example, semicolon, comma, and tab, vertical bar.
- In the Column delimiter field, select the delimiter that separates columns in the text file, for example, comma, semicolon, and tab, vertical bar.
- In the Text qualifier field, select a qualifier, if for example, the delimiter is a comma and the field value contains commas.
- Select Enclose all Fields to enclose all fields in the selected text qualifier.
- Click Export.
Exporting the Batch Results to an FTP Server
- In the Select Destination step, click File Export.
In the Select File Export Type step, select FTP Server.

NOTE: You cannot export duplicate records.
- In the Specify Export Parameters step:
- In the FTP server URL or IP address field, type this information.
- In the User Name field, type your user name.
- In the Password field, type your password.
- In the Export Directory field, type the directory path where the file will be saved.
- In the Export File Name field, type the name of the file.
For DB2, the length of the table name should be less than or equal to 18 characters.
- Then, select one of the following options:
- Click Replace existing file (if exists).
- Prefix file name to input (Replace existing file if exists).
- Prefix file name to input (Backup existing file (if exists) with time stamp (example: tablename_YYYYMMDDHHMM).
- Backup existing file (if exists) with timestamp.
- Append output to existing file (create if doesn't exist).
- Append match qualifier to file name.
- In the 5. Specify Export Format step:
- If the first row contains column names, select the First row has column names check box.
- In the Row delimiter field , select the delimiter that separates rows in the text file, for example, semicolon, comma, and tab, vertical bar.
- In the Column delimiter field, select the delimiter that separates columns in the text file, for example, comma, semicolon, and tab, vertical bar.
- In the Text qualifier field, select a qualifier, if for example, the delimiter is a comma and the field value contains commas.
- Select Enclose all Fields to enclose all fields in the selected text qualifier.
- Click Export.
Exporting the Batch Results to a Database Table
- In the Export Wizard window, Select Destination step, click Database Export.
- In the Select Database Type step, click Microsoft SQL Server or Oracle.
- In the Specify Connection Parameters step:
- In the Server address field, type the server address.
- In the User Name field, type your user name.
- In the Password field, type your password.
- In the Specify Export Parameters step:
- In the Database field, type the name of the database you are saving the batch to.
- In the Owner field, type the name of the database owner.
- In the Output Table Name field, type this information.
- Then, select one of the following options:
- Click Replace existing table if exists.
- Prefix table name to input (Replace existing table if exists).
- Prefix table name to input (Backup existing table (if exists) with time stamp). (Example: tablename_YYYYMMDDHHMM).
- Backup existing table (if exists) with time stamp.
- Append output to existing table (create if doesn't exist).
- Append match qualifier to table name.
- Click Export.


